
This is our third article about the evaluation of patients written for Medical Massage practitioners and those who would like to enter this exciting field. Our first article, “The Science of Clinical Interview,” was published in Issue #1, 2012: Contents of JMS, and the second article, “The Science of Visual Observation,” was published in Issue #2, 2015: Contents of JMS.
Palpation is a vital skill for the therapist. Only with fully developed and correctly used palpatory skills is the therapist able to conduct a detailed examination of the soft tissues on a layer-by-layer basis and formulate a correct treatment strategy.
No one is born with the exceptional ability to palpate. These skills must be developed and constantly updated by the therapist if he or she would like to be clinically efficient.
To fully understand and implement palpatory skills, the therapist must understand how the somatosensory system works. This system is responsible for delivering to our brain enough data to develop the sensations we feel: temperature and texture of surrounding objects, vibration, pressure in the tissues, range of motion, etc. Thus, knowing how the somatosensory system operates gives the therapist the foundation and tools for further development and refinement of the palpatory skills. This is why we will start with a short review of the somatosensory system, which relies on the function of four types of peripheral receptors – mechanoreceptors, thermoreceptors, nociceptors or pain receptors, and proprioceptors. For the topic of palpation, the mechanoreceptors and thermoreceptors are relevant, and we will concentrate on them.
The Somatosensory System and Palpation
Our main palpatory tools are our hands – especially our fingertips. The skin on the palmar surface of the hands and fingers, especially the fingertips, is unique in its structure:
- Skin on the palms doesn’t have hair, and this is why it is called glabrous skin. The hair follicles have their own receptors (see Fig. 1) and they fire as soon as the tip of the hair is moved, even before the object comes into contact with the skin surface. Thus, the presence of hair on the palms and fingertips would greatly reduce the sensory abilities of the skin.
- Skin on the palms is second in thickness only to skin on the soles.
- It has the greatest concentration of sweat glands (2736 per sq inch versus 554 on the thigh). Excessive moisture creates optimal conditions for the activation of the mechanoreceptors, and it helps us grasp objects more securely.
- The concentration of all sensory receptors on the fingertips is the greatest in the body (2500 per cm2). For example, there are 100 touch receptors per cm2 on the fingertips versus fewer than 10 receptors per cm2 on the dorsal surface of the hand.
- Skin ridges on the fingertips have the largest concentration of sensory receptors.
There is a very simple but illustrative Two-Point Discrimination Test which demonstrates the richness of innervation of the fingertips compared to any other part of the body. If you close your eyes and ask your friend to simultaneously press the tips of two toothpicks into the skin of the index finger, you will feel two points of pressure, even if the distance between the toothpicks is only 1 mm. At the same time, on the posterior leg, you will feel both toothpicks as one, even if they are placed within a distance of up to 40 mm (1.6 inches). Fig. 1 illustrates mechanoreceptors in the skin.
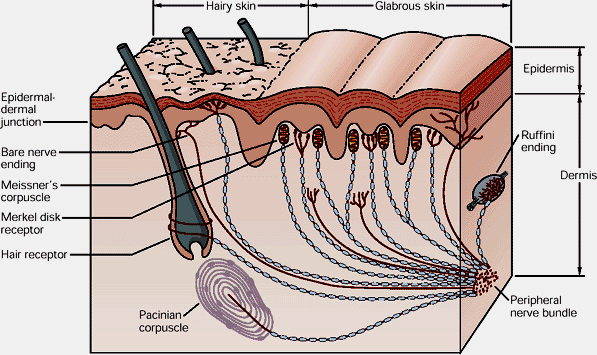
Mechanoreceptors which therapists employ during palpation respond to various degrees of deformation as the initial stimulation. All mechanoreceptors which deliver sensory information to the brain are divided into two groups: rapidly adapting and slowly adapting. This concept is very important for therapists, since it directly affects palpation skills. The rapidly adapting mechanoreceptors fire immediately, but with continuous stimulation, they very quickly cease the production of nerve impulses (i.e., action potentials) to the brain.
In contrast, slowly adapting mechanoreceptors do not respond to initial stimuli quickly, but they continue to fire to the brain, in some cases, even after the initial stimuli are withdrawn.
Merkel’s disk receptors are located in the top layers of the dermis and they detect touch (see Fig. 1). They are slowly adapting receptors. Merkel’s disks allow us to detect continued touch and pressure. However, they are very bad at detecting the beginning of touch and pressure.
Meissner’s corpuscle receptors are also located in the top layers of the dermis and detect touch (see Fig. 1). They are rapidly adapting receptors. Meissner’s corpuscles are very good at detecting initial touch or pressure but less effective in detecting continuous pressure. The combined information from Merkel’s disks and Meissner’s corpuscles allows us to examine and evaluate the texture of an object, e.g., rough patches on the skin in the areas of reflex zones.
Ruffini’s Endings are located in the deep layers of the skin (see Fig. 1) and react to stretching of the skin, which is an important element of palpatory evaluation, and to pressure stimuli, especially if they are applied at an angle. For example, the therapist will rely on Ruffini’s Endings when he or she uses Dicke’s technique for the examination of Connective Tissue Zones formed in the second level, i.e., the superficial fascia. Ruffini’s Endings are slowly adapting receptors.
Pacinian Corpuscles are rapidly adapting receptors, and they are primarily responsible for the detection of vibratory stimuli (see Fig. 1). For example, the therapist detects the pulsation of the subclavian artery to determine the correct position of the thumb for the examination of tension in the anterior scalene muscle.
The practitioner also uses thermoreceptors during the palpatory evaluation of the soft tissues. Thermoreceptors are found in the dermis layer of the skin (see Fig. 1). The following simple experiment illustrates how the temperature receptors work:
Place three tall glasses on the table and pour hot water into the left glass and ice-cold water into the right glass. Then pour room-temperature water into the middle one. Grab the glass with hot water with one hand while grabbing the glass with cold water with the other. After holding your hands on both glasses for more than a minute, grab the glass with room-temperature water with both hands. You will continue to feel that the glass is hot with one hand and cold with the other hand, despite the water in the middle glass being at room temperature.
Thus, the thermoreceptors are the best sensors when they detect fluctuations in the temperature of the object in comparison to the information which was already received and analyzed by the brain. We will come back to this later when we discuss the examination of the local temperature of the soft tissues.
Peripheral sensory receptors generate an enormous flow of action potentials through the sensory ascending part of the peripheral nerves all the way to the spinal cord, where it is initially processed and analyzed and conducted further to the brain, where the actual perceptions of touch, pressure, vibration, etc. are formed by the cortex based on the obtained data.
The Seven-Step Method of Learning Palpation
In this section, we would like to share with readers a very interesting professional suggestion on how to learn and optimize palpation skills. This Seven-Step Palpation learning sequence was developed by Aubin et al. (2014), and it is a very helpful guide, especially for students and therapists who would like to start or optimize their palpation skills. To make the information from the article easy to follow, we present the Seven-Step Palpation Method in a more detailed format and from the Medical Massage practitioner’s point of view.
Note that Steps 2-4 are based on visualization principles. Visualization techniques are very helpful when humans learn complex tasks (including palpation), since these techniques help our cerebral reorganization (Jackson et al., 2003). Also, you will notice that some steps are labeled “Advanced.” Master the basic steps first, but as soon as you get comfortable with them, work on the advanced steps to be able to determine the full clinical picture.
Step 1. Correct Position
The practitioner’s discomfort during palpation must be avoided to ensure the accuracy of the palpation. We observe it very frequently in Medical Massage seminars, when students are trying to palpate soft tissue while being in a very unfavorable biomechanical position. This simple adjustment greatly improves the work of the somatosensory system by forming and increasing correct sensory input to the brain.
To ensure the quality of palpation, don’t reach too far to different parts of the body from one position. If you need to palpate the body’s opposite side, go to the other side of the table. If you need to palpate along the segment, move the entire body with the palpating hand. The shorter the distance between your body and the hand(s) that conduct palpation, the less effort it requires and the more data your receptors collect.
Step 2 (Visualization). Anatomy of the palpated area and 3D visualization
The therapist must clearly understand what is under the skin in the area he or she palpates. Work on the anatomy and try to take a dissection course. It will greatly increase your professional skills.
The first part of Step 2 is having basic knowledge of the anatomy of the palpated area, which the therapist learns from anatomy textbooks or diagrams. The second part of Step 2 (Advanced) is the ability of the therapist to create a mental 3D image of the tissues in the area of palpation. Anatomy models and dissection courses are a great help. The third part of Step 2 (Advanced) is the ability of the therapist to correlate the 3D image of the palpated tissues and their relations with neighboring anatomical structures. For example, while palpating the pronator teres muscle on the anterior forearm, the therapist keeps in mind the pathway of the median nerve, which is located under it.
Step 3 (Visualization). Level of tissue contact
Fig. 2 illustrates the typical soft tissue arrangement using the posterior leg as an example.
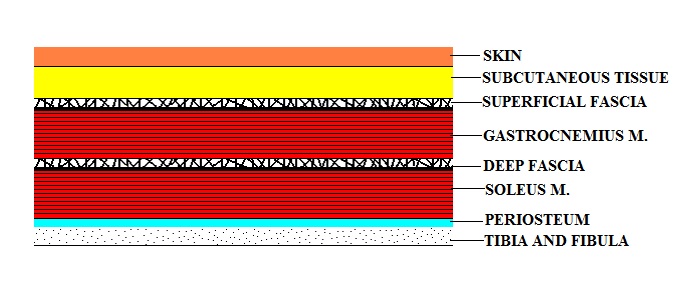
In other parts of the body, soft tissues may have one or two more layers of skeletal muscles separated by the fascia. Thus, before actual palpation, the therapist should have a clear vision of the desired depth of palpation. The degree and angle of pressure used during palpation depend on that.
Step 4 (Visualization). Clear identification of intentions
Before going further, the therapist should have answers to the following questions: “What are my intentions?” and “What am I trying to detect?” The answers to these questions are based on a successfully conducted clinical interview (see our article “The Science of Clinical Interview” in Issue #1, 2012 of JMS) and visual examination (see our article “The Science of Visual Observation” in Issue #2, 2015 of JMS). Only in such a case does palpation become an informative procedure. Otherwise, it is just purposelessly wandering in the tissues, hoping for accidental findings.
Step 5. Perceptual exploration
This step is the first palpatory contact with the patient. During its application, the therapist detects so-called qualitative components of tissues (tissue surface, first reaction to touch, changes in tissue density, elasticity, local temperature, local swelling, etc.) and quantitative components of motion (amplitude, asymmetry, and dysfunction intensity). We will discuss these issues in detail in the following parts of this article.
Step 6. Palpatory evaluation of the movement or tissues with regard to an established reference point (Advanced)
The video below illustrates the application of Step 6 for the evaluation of the movement. The initial goal is to examine the difference in pelvic elevation on the affected and unaffected sides during active abduction in the shoulder joints.
First, the therapist determines the positions of both iliac crests with both hands while the patient comfortably stands. Thus the therapist establishes reference points. Next, the therapist asks the patient to lift both arms and tries to detect any elevation of the pelvis on the affected side while the arms are being slowly elevated. While the patient elevates the arms, the therapist tries to detect how the movement affects the reference points.
As readers can see in the video, the active abduction in the right shoulder joint triggers elevation of the right side of the pelvis. The therapist may observe this picture in cases of a tense quadratus lumborum muscle.
A reference point can also be established for soft tissue palpation. For example, during the Sensory Test, which we will discuss in the following part of this article, the therapist detects abnormalities in the skin’s innervation within the affected dermatomes. To do that during the application of the test, the therapist must first establish an initial reference point from which the test is conducted along or across the examined dermatomes.
Step 7. Evaluation of parameters (Advanced)
This step includes the evaluation of changes in the structure of the tissues or quantitative changes in movements that have occurred since the last treatment session.
In Part II of this article, we will discuss all types of palpation and the rules of their application.
REFERENCES
- Aubin A, Gagnon K, Morin C. The seven-step palpation method: a proposal to improve palpation skills. Int J Osteopath Med. 2014;17(1):66-72. doi:10.1016/j.ijosm.2013.02.001
- Jackson PL, Lafleur MF, Malouin F, Richards CL, Doyon J. Functional cerebral reorganization following motor sequence learning through mental practice with motor imagery. Neuroimage. 2003;20(2):1171-1180. doi:10.1016/S1053-8119(03)00369-0
ABOUT THE AUTHOR

Ross Turchaninov, MD
Dr. Turchaninov graduated with honors from the Odessa Medical School in Ukraine in 1982. He was admitted to the residency program of the Kiev Scientific Institute of Orthopedy and Rehabilitation, which he completed in 1985.
After his residency, he worked as a physician at the Clinical Hospital of Department IV of the Ukrainian Ministry of Public Health.
From 1986 to 1988, he worked as a supervisor of the rehabilitation program for the Ukrainian Ministry of Public Health. During these years, he also worked with the medical team of the relief effort following the Chernobyl nuclear plant disaster.
From 1988 to 1992, Dr. Turchaninov worked as a senior scientific researcher at the Kiev Scientific Institute of Orthopedy and Rehabilitation.
In 1989, Dr. Turchaninov obtained his PhD degree in medicine, and in 1990, graduated from the Kiev Scientific Institute of Orthopedy and Rehabilitation’s manual therapy and medical massage programs designed for physicians.
In 1992, Dr. Turchaninov was invited to work in rehabilitation centers in New York City and Scottsdale, Arizona, as head of their medical massage program.
In 1998, he founded the publishing company Aesculapius Books. He lectures in the U.S. and abroad on issues of manual therapy and medical massage, and is regularly invited to speak at American and international conferences.
Dr. Turchaninov is the author of more than 40 scientific papers and other publications in European and American medical journals. He is the author of three major textbooks: Medical Massage, Volumes I and II, and Therapeutic Massage: A Scientific Approach.
He is the founder and editor of the Journal of Massage Science. Dr. Turchaninov lives in Phoenix, Arizona, with his wife and daughter. His interests are literature, art, history and travel.
Category: Medical Massage
Tags: JMS 2015 Issue #4
