
This is the second part of our original article on the treatment of pneumonia using massage therapy. We highly recommend our readers to first read Part 1, which was published in Issue #1, 2013 of JMS. In this article, we discuss the protocol of therapeutic massage (TM) used for medical purposes in order to treat patients with pneumonia.
There are two major clinical objectives a massage practitioner should consider while treating patients with pneumonia: Support of pulmonary drainage and decrease of pulmonary inflammation.
1. SUPPORT OF PULMONARY DRAINAGE
One of the critical aspects of rehabilitating patients with pneumonia is immediate and effective pulmonary drainage. Bronchial and parenchymatous (i.e., pulmonary tissue) inflammation is accompanied by sputum production and its accumulation in the bronchial tree and alveoli. The sputum, in addition to creating problems for ventilation, is a perfect breeding ground for the bacteria or viruses that caused the initial inflammation. Thus, efficient sputum drainage is a key component of pulmonary rehabilitation for patients with pneumonia.
Considering the sticky nature of the sputum and its constant production, effective pulmonary drainage can be achieved only when percussion and vibration-massage techniques are applied to the patient’s chest while he or she is placed in the special position for the optimal drainage of the affected lobe of the lung. Inflammation in each lobe requires a special body position to optimize usage of the force of gravity for efficient pulmonary drainage. It allows the sputum to detach from the walls of the bronchial tree and drain so the patient can expectorate it.
2. DECREASE OF PULMONARY INFLAMMATION
Another equally important clinical aspect of massage therapy in cases of pneumonia is the ability to decrease pulmonary inflammation by using viscera-somatic reflexes discussed in Part I of this article (see Issue #1, 2013 of JMS). In such case, the therapist works on the areas of the body that share same innervation as the affected part of the lung or/and eliminate reflex zones which formed secondly in the soft tissue as a physiological response to the original pathological process in the lungs.
The practitioner can achieve this in three ways:
a. Application of Therapeutic Massage (TM)
In this scenario, the practitioner uses the combination of intensive massage techniques applying them in special order to the area of the body that shares innervation with the affected lobe of the lung. During the session, the practitioner slowly builds up massive sensory input from the soft tissue to the spinal cord by applying stimulating massage techniques (friction, quick kneading, percussion). Such intense sensory stimulation triggers motor response back to the stimulated tissues in the form of long-lasting hyperemia (i.e., local vasodilatation). At the same time, motor response is delivered to the areas of the lung that share the same innervation with the main target area and promotes resolution of the pulmonary inflammation.
b. Segment-Reflex Massage (or similar methods)
Using medical massage methods and techniques, the practitioner detects the presence and eliminates reflex zones formed in the skin (i.e., dermatome), fascia and skeletal muscles (i.e., myotome) and perisoteum (i.e., sclerotome).
C. Combination Of Two Approaches
The practitioner combines two approaches by incorporating medical massage techniques into the protocol of TM. This is the most sophisticated approach to the pulmonary rehabilitation.
INDICATION AND CONTRAINDICATION
Massage therapy as a clinical tool of pulmonary rehabilitation should be used when the patient is ready. Here are two main criteria that the practitioner should use to determine the appropriate time when massage therapy should be initiated:
1. Decrease of fever. Body temperature drops below
2. Productive cough. The patient starts to cough out sputum.
Below is the outline of conditions associated with pneumonia when any type of massage therapy is contraindicated. They are:
1. Initial period of pneumonia when inflammation infiltrates pulmonary tissue or until effective antibiotic therapy start to control initial inflammation;
2. Lung abscess before it enters resolution phase;
3. Pleurisy complicated by pleural effusion (i.e., accumulation of the fluid in the pleural cavity);
4. Tachypnea or increased respiratory rate above 25 per minute;
5. Pulmonary bleeding;
6. Severe bronchoconstriction or Status Asthmaticus (i.e., severe asthma attack that does not respond adequately to bronchodilator therapy).
BASIC RULES OF MEDICAL MASSAGE APPLICATION
The protocol presented below is taken from Dr. T.V. Mitichkina’s textbook (2012). The videos are based on the same publication and created by JMS.
1. SEQUENCE OF MASSAGE
The first critical rule of application of TM for medical purposes is the correct sequence of massaged areas of the body. The major goal is the creation of massive sensory afferent (i.e. ascending) input from the soft tissue into the spinal cord and eventually brain. The activation of CNS will form motor efferent (i.e., descending) output to the massaged tissues and at the same time to the affected areas of the lungs. However, this has to be done in the correct way considering the pattern of innervation along the vertical and horizontal axis of the body.
a. Sequence of TM along the VERTICAL AXIS of the body:
As Dr. O. Glezer and Dr. V.A. Dalicho (1955) stated in their publication, the patient will get maximum clinical benefits if the practitioner starts the session by working on the areas of the body that are located below the chest (i.e., lower back).
The next part of the session is to work on the areas of the body above the affected area (i.e., upper neck and shoulders), and, finally, concentrate on the chest which is main therapeutic area where soft the tissues share common innervation with the affected areas of the lung.
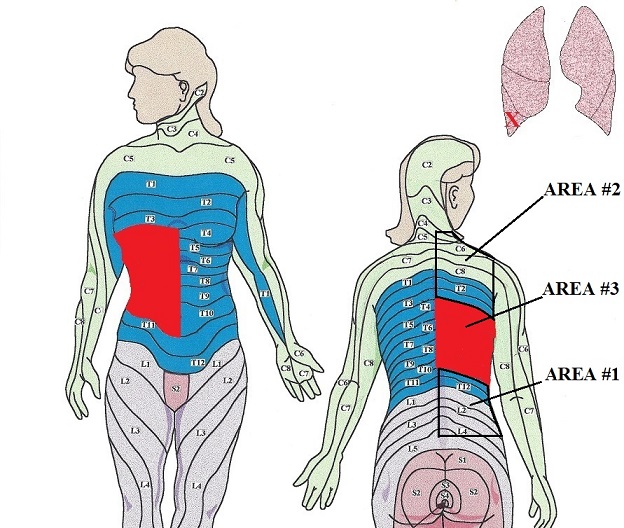
In this article, we use as an example a patient with pneumonia in the right lower lobe of the lung. The main target area for this localization of pulmonary inflammation is the T4-T10 dermatomes (see Fig. 1). In such case, the practitioner must start the session with the lumbo-sacral area (area #1) then move to the neck and upper shoulders (area #2) and, only after that, concentrate on the main target area (area #3), which is colored red in Fig. 1.
b. Sequence Of TM Along The HORIZONTAL AXIS Of The Body:
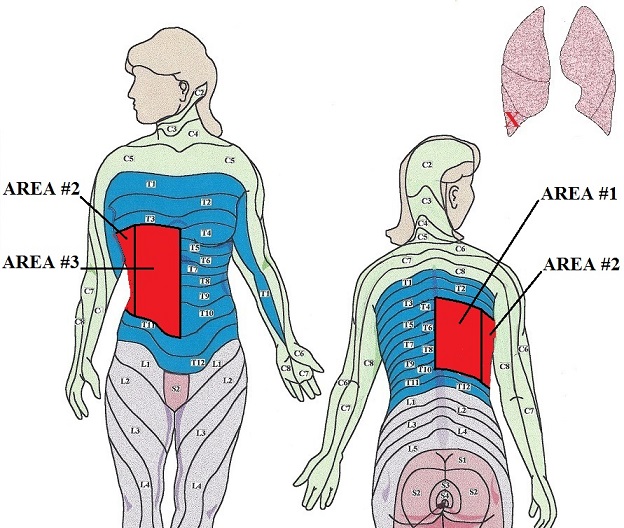
The next issue is how to work on the main target area correctly. Again, look at Fig. 1. According to the basic concept of reflex therapy, the paravertebral areas of T4-T10 dermatomes are the most closely located to the segments of the spinal cord which are responsible for the innervation of these dermatomes and pulmonary lobe that share same innervation. The peripheral receptors in the soft tissues closest to the spinal cord will generate greater afferent sensory input into the spinal cord sensory information travels faster to the spinal cord from paravertebral areas than from more distal areas (e.g., T4-T10 dermatomes on the anterior chest and abdomen).
Thus, when the practitioner starts to work on the main therapeutic area, he or she should begin closest to the spinal cord areas of the targeted dermatomes (i.e. paravertebral areas) and slowly move to the more distant pars (lateral and finally anterior surfaces of the chest). By doing that, the practitioner gradually and consistently builds up massive sensory stimulation from the soft tissues of main therapeutic area.
In our case example, when working on the main therapeutic area in cases of the pneumonia which is located in the right lower lobe, the practitioner should start with area #1 creating the quick flow of ascending sensory stimuli then move to area #2 and finish by working in area #3 (see Fig. 2). By creating immediate powerful sensory inflow into the spinal cord and gradually moving away from the vertebral column, the practitioner generates lasting sensory bombardment of the segments of the spinal cord that generates the motor stimulation to all tissues including the lungs, which are innervated by the stimulated segments of the spinal cord.
2. TECHNIQUES
The primary goal of massage in cases of pulmonary rehabilitation is the creation of massive sensory input into the CNS with expected motor outcome to the massaged areas and affected areas of the lung. To achieve this, the main treatment techniques are friction, intense kneading and various percussion techniques. Treatment will be more effective if the practitioner uses severalvariations of these basic techniques.
Another critical aspect of successful treatment is the speed of applied techniques. There is no way the practitioner can improve the health of the patient by using the slow, gliding strokes of Swedish massage. The application of any technique must be done quickly with frequent changes of speed, direction and varieties of applied techniques. To do that properly without exhaustion, the practitioner must use correct body mechanics. This important issue was discussed in special article: ‘Body Mechanics’ published in November/December Issue of JMS in 2009.
3. STRUCTURE OF THE SESSION
The basic length of the massage session is 35-40 minutes. Depending on the area, the practitioner plans to work on the patient should be placed on the stomach, back, unaffected side and stomach again. Two-thirds of the session (approximately 20 minutes) is spent on the patient’s back and one-third (approximately 10 minutes) on the anterior surface. Overall, one-third or at least 10 minutes of the entire session must be spent on the main therapeutic area. The course of the therapy consists from 10-15 sessions conducted daily or every other day.
MEDICAL MASSAGE PROTOCOL
STEP 1. WORK IN THE LOWER BACK
a. Superficial and deep effleurage in the lower back along the drainage (30-40 seconds):
The patient lies on the stomach. Bi-manual superficial and later strong effleurage strokes from middle back down to the sacral areas.
For the superficial effleurage, the entire palm(s) is used while deep effleurage should be conducted using the thumb and thenar area, base of the hand or its ulnar edge as a main contact areas.
In the second part of Video 1, notice that deep effleurage strokes on the lower back are conducted along 2-3 paravertebral lines (depending on the size of the back) where each line is located more laterally from the vertebral column.
The Video 2 below illustrates quick, stimulating superficial effleurage strokes with alternating hands as another treatment option.
b. Work on the skin (1 min)
Skin rolling and skin kneading allow the practitioner to address skin and superficial fascia at the same time. It is especially important since reflex zones in the form of connective tissue zones (CTZ) have a tendency to form in the the dermis of the skin (first level of CTZ) and in the superficial fascia (second level of CTZ). The Video 3 below shows the application of skin rolling along paravertebral lines and later application of skin kneading.
c. Kneading of the paravertebral muscles on the affected side of the lower back (2 minutes)
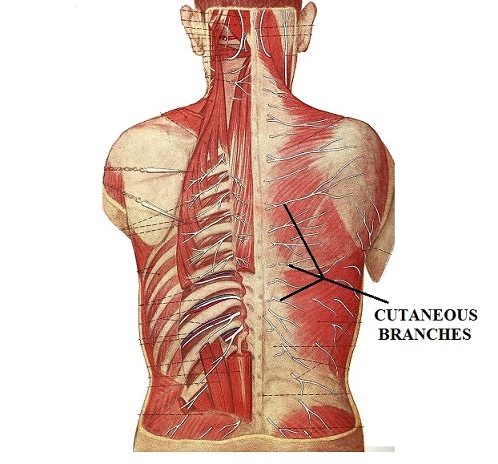
Since the cutaneous branch of each spinal nerve, which innervates the corresponding dermatome, emerges under the skin through layer of paravertebral muscles (see Fig. 3), the proper relaxation of these muscles becomes important part of the therapy. Compression of cutaneous branches of the spinal nerves by paravertebral muscles and superficial fascia decreases the sensory input and motor output triggered by massage.
Start with the lower lumbar area and move up to the level of T12. Various kneading techniques can be used. The Video 4 below shows examples of thumb kneading and hook-type kneading.
The successful execution of each kneading techniques requires correct body mechanics. Without this important component, kneading becomes a very exhausting technique for the practitioner. To review the article on correct body mechanic, please go to November/December Issue of JMS, 2009. This step should be finished with the techniques of relaxation of the paravertebral muscles: big fold technique or general technique shown below in Video 5.
c. Friction along the paravertebral areas (0.5-1 minute)
Friction starts from the L5 to T11. The following techniques can be used:
Fork-type friction shown in the Video 6 below applied in the grooves between lateral surface of the spinous processes and medial edge of paravertebral muscles on both sides. Notice that the other hand provides additional pressure.
Friction using the knuckles of the proximal interphalangeal joints shown in the Video 7 below. Notice that the active hand slightly presses the skin against superficial fascia and skeletal muscles while applying back and forth friction.
The vertical pressure during the strokes comes from the practitioner slightly leaning forward on the active hand. Also, as shown in the Video 7, the passive hand is placed over the active hand to reinforce the vertical pressure during the strokes and save the practitioner’s energy. Friction is applied in the direction of the pelvis and when the active hands reaches the pelvis, it opens up and moves back to the starting level with superficial effleurage using fingertips. While the hands are returning to the starting position they are slightly moved laterally and the strokes are repeated.
The bi-manual variant of same technique can be used on patients with a large area of lower back. In this cases both hands act as one tool. The left fist grabs the right thumb and both hands apply the same friction simultaneously.
Z-shaped friction using the base of the hand is shown in the Video 8 below. Be sure to use body weight as a major contributor to the vertical pressure elicited by the hand.
STEP 2. WORK ON THE NECK AND UPPER SHOULDERS
a. Superficial and deep effleurage in the neck and upper back along the drainage (30-40 seconds)
Apply the same principles discussed in Step 1 (a): VIDEO 1 and 2. Direct effleurage strokes from the neck down to the posterior surface of the both shoulder joints. The Video 9 below presents the direction of effleurage strokes.
b. Work on the skin (1 minute)
Work on the skin of the upper shoulder with the same principles discussed above in Step 1 (b), Video 3
c. Kneading of the paravertebral muscles on the affected side of the neck and upper back (2 minutes)
Apply the same kneading techniques discussed in Step 1(c), Video 4 starting from C2 to T2.
d. Friction on the upper part of the trapezius muscle (1 minute)
The practitioner concentrates on the upper shoulders and neck using friction techniques discussed in Step 1(d): Video 6, Video 7 and Video 8. Also work in detailing along the entire upper part of the trapezius muscle using friction alone and later across muscle fibers. Remember that upper part of the trapezius muscle has two portions: horizontal and vertical and this factor must be considered when frictions are used.
STEP 3. WORK ON THE MAIN THERAPEUTIC AREA OF MIDDLE BACK (T3-T11 DERMATOMES)
As discussed above, the right lower lobe is innervated by the T4-T10 segments of the spinal cord. Considering the overlapping phenomenon of spinal innervation the practitioner must include T3 and T11 into the treatment protocol since T3 spinal nerve gives 25% of innervation to T4 dermatome and T11 spinal nerve gives 25% of innervation to T10 dermatome. Video10 below shows the anatomical landmarks and borders of the main therapeutic area in the middle back.
a. Effleurage along the drainage (1 min).
Superficial and deep effleurage strokes are applied form level of T12 all way up to the posterior surface of the shoulder joint. The Video 11 below shows the direction of effleurage strokes.
b. Work on the skin (1 min)
Work on the skin of the main therapeutic are with the same principles discussed above in Step 1 (b), Video 3
c. Kneading of paravertebral muscles between T11 and T3 (3 minutes)
Apply kneading techniques discussed above in Step 1 (c): Video 4 and Video 5
d. Friction on the paravertebral areas of T11-T3 (1 minute)
Apply same principles of friction discussed in Step 1(c): Video 6, Video 7 and Video 8.
e. Stimulation of subcutaneous branches of T11-T3 of spinal nerves (3 minutes)
Intensive friction and interruptive manual or better electric vibration should be used in the areas where each branch of T11-T3 spinal nerves emerge from the paravertebral muscles and now located directly under the skin (see Fig. 3). Each of these areas is located between two spinous processes on the paravertebral line. The Video 12 illustrates identification of T7 and T8 spinous processes, location of the cutaneous branch and the application of intense thumb friction and electric vibration.
f. Friction on the posterior parts of the T11-T3 intercostal spaces (2 minutes)
The posterior parts of T8-T3 intercostal spaces are covered by back muscles which is why the practitioner should slightly compress the muscles first and use them as a tool to apply friction in the intercostal spaces. Do not activate the pain analyzing system but increase the intensity of the friction. Your fingers are supposed to slide with the skin (see Video 13).
From T11 to T8, the intercostal spaces are directly available for the application of friction while the patient is positioned on the stomach. Start with raking friction by placing each finger on the separate intercostal space. In such case, you will work on four intercostal spaces simultaneously, which saves time. Start on the lateral surface and move to the spine while applying friction along the intercostal spaces. Bi-manual variant of raking friction demands less energy since the other hand applies additional pressure. Video 14 below illustrates raking friction with one and two hands.
After raking friction apply friction along each intercostal space from T10 to T8. Place the thumb on its side, press it into intercostal space and, while maintaining this pressure, add friction against the LOWER edge of the UPPER rib. After that, switch the thumb and work along the UPPER edge of the LOWER rib. The Video 15 below illustrates friction along T8 intercostal space.
STEP 4. WORK ON THE LATERAL PARTS OF THE T10-T8 INTERCOSTAL SPACES
a. Friction on the lateral areas of the T10-T4 intercostal spaces (2 minutes)
The patient is positioned on the unaffected side with his or her arm over the head (first part of the Video 16). This position additionally opens the intercostal spaces for the application of friction. Be aware of the slanted direction of the intercostal spaces on the lateral surface of the chest (second part of the Video 16).
Start with raking friction with the same principles as shown in Video 14. The application of friction along the 7th intercostal space is shown in the third part of Video 16.
STEP 5. MASSAGE OF THE UPPER ABDOMEN (3 minutes)
The T11 – T6 spinal nerves, which innervate the lower lobe of the lung, also innervate the anterior abdominal wall. This is why this area should be included in the therapy. The therapy should target the abdominal wall itself. In other words this part of session is not abdominal massage since the practitioner should not sink into the abdominal cavity. However, strokes still follow the pathway of the large intestine.
The patient lies on his or her back with knees bent. Start with superficial effleurage along the large intestine. The practitioner stands at the right side of the patient and applies intense repetitive superficial effleurage strokes (first part of Video 17). The next step is skin kneading, stretching and rolling-over along the anterior abdominal wall from the level of the navel to the right epigastrium (second part of Video 17). The final step is wave kneading of the rectus (third part of Video 17), obliqus and transverse abdominal muscles.
STEP 6. MASSAGE OF THE ANTERIOR CHEST
a. Massage of the pectoral muscles (2 minutes)
Start with deep effleurage along the drainage from the pectoral area to the axillary pit. Avoid the breast in women and the nipple in men. Ask female patients to move the breast away from the strokes. Video 18 below illustrates direction of the strokes
b. Apply kneading of the pectoral muscles (1 minute)
c. Friction along the lateral edge of sternum (1 minute)
Apply intensive friction on the lateral edge of the sternum in each intercostal space starting from the 3rd one. Place the finger between two ribs, apply direct pressure against edge of sternum and use friction with small amplitude staying in the intercostal space. Be sure to communicate with patients since during this part of the session since friction can be extremely painful especially at the beginning of the therapy. Apply pressure on the subthreshold level of pain. The first part of Video 20 helps locate the lateral edge of the sternum while the second part of the Video 20 shows the application of friction on the lateral edge of the sternum in one (3rd) intercostal space.
d. Friction along the intercostal spaces of T5-T10 (2 minutes)
Apply friction along T10 – T3 intercostal spaces using the same approach discussed above in Step 4 (a).
STEP 7. SHAKING OF THE CHEST (0.5 min)
Place both hands on the sides of the chest, slightly compress it and apply active shaking of the thorax in the anterior/posterior and lateral directions (see Video 21).
STEP 8. POSTISOMETRIC MUSCULAR RELAXATION (PIR) OF INTERCOSTAL MUSCLES (4 minutes)
To relieve pressure developed in the intercostal muscles, which are critically important in the respiratory cycle, the practitioner should restore their anatomical length and eliminate tension. The simplest and quickest method is application of PIR. PIR can be used when the patient is placed into two positions: on the unaffected side and on the back.
Video 22 illustrates the use of PIR with the patient positioned on the unaffected side (left side in the video) with the right arm placed above the head. The practitioner places one hand on the patient’s chest with each finger in the intercostal space. Thus, the practitioner works on four intercostal spaces at the same time. The other hand is placed on the top to reinforce the vertical pressure.
The patient deeply inhale first and while he is exhaling the practitioner applies slight vertical pressure additionally collapsing the chest during the exhalation. When the patient instigates new inhalation the practitioner starts to resists the chest expansion with both hands. The pressure should be moderate to allow the patient to expand the chest but with effort. After 2-3 repetitions, the practitioner may also suddenly release counter-pressure at the peak of inhalation (see last two applications at the end of the Video 22).
If the patient coughs, hold steady pressure on the chest to help drain sputum. Since males primarily use abdominal breathing, the practitioner should insist on the thoracic breathing pattern and should practice it with the patient before application of PIR.
If the patient is positioned on his or her back, the practitioner should place both hands on the sides of the chest with fingers of each hand in the intercostal spaces. First, the patient inhales without counter-resistance. During following exhalation, the practitioner applies additional compression of the chest against the table and between the hands. When the patient instigates new inhalation, the practitioner starts to counter resist in the same manner discussed above. Video 23 illustrates the application of PIR with the patient positioned on the back
Mitichkina T.V. Rehabilitation of Patients with Pneumonia. Novokuznetsk Medical University, Novokuznetsk, 2012
Category: Medical Massage
