
SCIENCE OF PALPATION. PART III
PALPATION OF THE SOFT TISSUE IN THE MIDDLE LAYERS
By Dr. Ross Turchaninov
In Part I of this article published in Issue #4 of JMS, 2015 we discussed general rules of soft tissue palpation. The Part II published in Issue #1 of JMS, 2016 covered the rules of superficial palpation which the therapist should use while examining skin and Connective Tissue Zones in the first level located in the skin.
This article discusses how to palpate the soft tissues located in the middle layers: Connective Tissue Zones in the second level (i.e., superficial fascia), superficial skeletal muscles, tendons, ligaments and periosteum.
CONNECTIVE TISSUE ZONES (CTZS)
As we discussed in Part I of this article, the tension in the connective tissue structures may accumulate in three levels: Skin (CTZs of the 1st level), Superficial Fascia (CTZs of the 2nd level) and Deep Fascia (CTZs of the 3rd level). In this article we will discuss palpation of the CTZs in the second level in the superficial fascia.
The first sign of tension build up in the superficial fascia is restricted mobility of the skin. Since skin and subcutaneous tissue are held against the superficial fascia by a system of fibrotic bridges (see Fig. 1) any tension build up in the superficial fascia will immediately shorten these bridges and they will anchor skin against the fascia. Thus the elasticity of fibrotic bridges gives the therapist important information about the degree of tension built up in the superficial fascia (i.e., CTZs of the 2nd level).
Fig. 1. Superficial fascia and fibrotic bridges on the posterior shoulder (Kovanov and Travin, 1983)
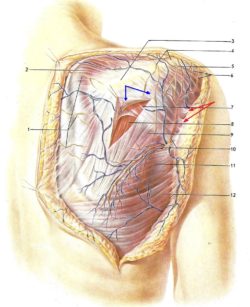
Blue arrows – superficial fascia which covers the posterior portion of the deltoid muscle
Red arrows – system of fibrotic bridges holding skin and subcutaneous tissues against superficial fascia
There are two ways to detect the presence of tension in the superficial fascia: Second Part of Kibler’s Technique and Dickle’s Technique.
Second Part of Kibler’s Technique
In Part I of this article we discussed superficial palpation and application of the First Part of Kibler’s Technique to examine CTZs of the 1st level located in the skin. The Second Part of Kibler’s Technique allows the therapist to estimate the health of superficial fascia based on the elasticity of fibrotic bridges which connect fascia and the skin (Kibler, 1958).
The therapist should grab folds of skin between the thumb and index fingers on both sides in symmetrical areas and lift the skin. If fibrotic bridges are shortened the therapist will feel restriction of vertical lift since skin is now anchored to the fascia.
The video below illustrates application of the Second Part of Kibler’s Technique. Notice the restriction of the vertical lift of the fold of the skin on the left side compared to the right side in the middle back of the patient.
Fig. 2. Dickle’s Techniques applied in the lower back paravertebrally
The only disadvantage of the Second Part of Kibler’s Technique is its lack of information in cases of excessive accumulation of subcutaneous fat. In this scenario the vertical lift of the skin will be painful for the patient and it will completely mislead the therapist since the patient will be fighting the pain and tight tissues.
Thus, the Second Part of Kibler’s Technique should be used on patients with a thin layer of subcutaneous tissues. If the patient has a thick level of subcutaneous fat the therapist should use Dickle’s Technique to examine the tension in superficial fascia.
Dickle’s Technique
Dickle’s Technique can be informative on all patients (Dickle, 1979). The goal of this evaluation technique is to stress the skin by applying the forward shift which will test elasticity of the fibrotic bridges (Ebner, 1985).
The therapist slightly presses the fingertips into the skin, stabilizing it against the fascia in the tested area. Now using the weight of the body lean forward pushing the skin forward. Don’t slide over the skin! The picture below illustrates results of Dickle’s Technique applied in the lower back.
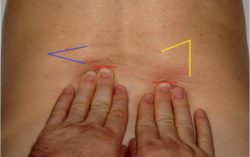
Red lines – position of the fingertips
Blue lines – fold of skin formed in front of fingertips on the normal side
Yellow lines – size of the ‘orange peel’ sign on the affected side
Compare the position of the therapist’s hands and the changes in the soft tissues happening in front of the fingertips. Here is what the therapist should pay attention to on the affected side compared to the normal side:
1. There is restriction of the forward shift of the skin in the affected area compared to the opposite side. As you can see the fingertips of the left hand were able to push skin farther compared to the right side (different position of red lines)
2. There are no small folds of skin formed in front of the fingertips on the right side due to the skin anchored against fascia by short fibrotic bridges, while on the left normal side they are clearly visible (blue lines).
3. On the affected right side the so called “orange peel” sign is clearly visible (yellow lines). This sign illustrates presence of the short fibrotic bridges. Each dimple which is seen in the area of the “orange peel” is where individual fibrotic bridges, which originated from the superficial fascia, insert into the skin.
If the fibers become shorter the application of pressure to the skin, in the form of forward shift, stresses the fibrotic bridges, which in turn pull skin in at their insertions, creating dimples which form ‘orange peel” sign. The presence of these dimples on the right side in the front fingertips confirms that tension has built up in the superficial fascia. The larger the area of orange peel the more tension that has accumulated in the superficial fascia.
REFLEX ZONES IN THE SUPERFICIAL SKELETAL MUSCLES
The superficial skeletal muscles are easy to palpate since only the skin with subcutaneous tissues and fascia separate the palpating hand from the muscle. Since there are three types of hypertonic muscular abnormalities, the rules of palpation are slightly different for: Hypertonus, Trigger Point and Myogelosis.
Hypertonus (HT)
Hypertonus is first reaction of the muscle to the injury or irritation or compression of the nerve which innervates the muscle. The simple example of HT is the muscle tension the therapist may feel while examining the muscle of a person who over exercised day before.
Since HT usually is less painful, there is less defined pain during the application of the Jump Test. Also, the larger group of muscle fibers will be involved into HT. If the muscle is small the entire muscle belly is tense and if the muscle is large a significant part of muscle fibers are affected.
The palpation of HT is a relatively simple procedure. The therapist should arrange fingertips 2-3 or 3-4 fingers placing them flat and across the muscle fibers if the muscle is large, or one finger if the muscle is small. The vertical pressure is basically the weight of the hand with very little extra vertical pressure which is always coming from the other hand placed on top of the palpating hand. This is a critically important component of correct muscle palpation. We will discuss it in detail in Part IV of this article in the next issue of JMS.
The first goal is to control the skin to prevent sliding of the fingers. The video below illustrates the palpation of HT in the lower part of the right trapezius muscle. Notice the placement of the palpating hand across fibers of the trapezius and application of vertical pressure by the other hand placed on top of the palpating hand.
After skin stabilization with flatly placed fingertips, move fingers across the muscle fibers to detect the borders of the HT if the muscle is large, comparing muscle tension to the unaffected part of the muscle. If the muscle is small the same evaluation should be conducted on the opposite side to compare and detect differences.
Trigger Point (TP)
TP in the muscle characterized by acute, local pain if TP is active. Usually the patient is able to pinpoint its location. TP charts are also a great help. In such case the goal of palpation is to confirm the TP using the Jump Test. This test is highly reliable in detecting presence of active TP (Al-Shengiti and Oldham, 2005)
However next equally important step is to detect the so called “entrance” into the TP which reflects the predominant orientation of the tensed fibers, which form TP, within the muscle belly. This is a critical piece of information since by knowing the entrance into the TP the therapist will be able to obtain optimal outcomes of TP Therapy while eliciting as little pressure as possible on the soft tissue.
The video below illustrates the application of the Compass Technique to detect entrance into the TP. Apply finger or tool into the area of TP and get the first reading of the Jump Test. Your patient will immediately confirm that ‘yes’ this is area where he or she feels pain. Now without decreasing the intensity of pressure, start to change direction of its application every time asking the patient to tell you if the intensity of initial pain changes. You are looking for the angle of applied pressure where the same intensity of stimulation (i.e., tissue compression) elicits the most uncomfortable sensations. Thus the therapist uses the same pressure while only its direction is changed and in one particular angle the intensity of pain the patient feels significantly raises. This is the entrance into the TP.
After detecting entrance into the TP the therapist should approach this TP only from this angle to achieve optimal results of Trigger Point Therapy while using as little pressure as possible.
Myogelosis (MG)
MG is the medical term which describes knots or the feeling of ‘marbles’ around formations with well-defined edges detected in the belly of the muscle. For everyone who reads this article: Never promise your client to work on these nodules and eliminate them! They are irreversible degenerative changes in the muscle (Windisch et al., 1999) and excessive application of pressure on the core of MG only makes it larger . In the long run and therapist is hurting his or her client with such “therapy” while producing only temporary relief.
The best outcome of local therapy on MG is to control its core which is generally painless and to prevent its growth by reducing so called perifocal tension around the core. This surrounding tension which can be in form of hypertonus or active TPs is responsible for the symptoms in the area of MG and its elimination gives the patient life back while preventing growth of the core.
Thus the goals of palpation of MG in superficial muscles is to confirm the presence of the core first and after that detect the size of the perifocal tension formed around the core. The definite indicator of MG presence is a firm, round nodule with well-defined edges which frequently slips from under the finger when vertical pressure is applied. The first part of video below illustrates this sign. Notice the therapist’s thumb slips from the top of the core when vertical pressure is applied on the MG located in the horizontal portion of the left upper trapezius muscle.
Detection of perifocal tension around the core is similar to the palpation of hypertonus we discussed above. The second part of this video below illustrates this process. After detecting the location of the core of MG (black dot in the video) the therapist starts palpation with fingertips from the core to the periphery, detecting when perifocal tension formed around the core disappears and normal muscle tone is palpable. In the second part of the video above borders of perifocal tension are marked by dashed line.
PERIOSTAL REFLEX ZONES
Periostal reflex zones in the form of Periostal Trigger Points (PTP) form at the insertion of the soft tissues (tendons, ligaments, capsule of joints) into the periosteum which covers all bones (Vogler and Krauss, 1953). Since periosteum is extremely richly innervated membrane any local inflammation there triggers acute pain. In fact, the active PTPs are more painful than TPs in the muscles or skin.
Palpation of the PTP is done only in the parts of the body when bone is covered by the skin only and mostly at the insertion of soft tissues.
There are two steps in palpation of the PTPs. The first step is a very simple application of direct pressure on the bone which will immediately elicit a pain reaction. This indicates the presence of the active PTP. However, an equally important component is step two which allows to detect local inflammation at insertions of the soft tissues into the bone. To do that the soft tissues must be mobilized first.
The video below illustrates two examples of periosteum palpation: evaluation of the PTP in the lateral epicondyle of the humerus in cases of Tennis Elbow and evaluation of PTP developed along the first metacarpal bone.
Please notice that in both cases the direct application of pressure on the periosteum followed by further mobilization of the surrounding soft tissues to expose parts of the periosteum otherwise hidden from the evaluation by surrounding soft tissues. Acute pain while pressure is applied in these areas indicates the presence of PTPs which are responsible for the lingering protective tension in the soft tissues inserted there.
TENDONS
Palpatory evaluation of inflammation developed in the tendon or tendinitis requires the palpation of the tendon when it’s put under stress by a contracting muscle. The video below shows the examination of tendon of biceps brachii.
Notice that the therapist first asks the patient about active contraction of the muscle of the tendon that was tested while counter resisting it. With the other hand the therapist palpates the tendon, first examining the presence of pain during the application of direct pressure and after that the size of the tendon.
The tendon affected by Tendinitis always feels thicker (Berner and Zufferey, 2015). To detect the difference in tendon thickness the therapist first should examine the same tendon on the unaffected side to be able to compare.
LIGAMENTS
Palpatory Evaluation of the ligaments also requires putting them under stress, but differently. With the tendons the stress is applied in the form of counter resistance to the muscle contraction. For testing ligament stress is applied in the direction opposite to the ligament’s anatomical function. The video below illustrates the testing of the medial collateral ligament of the right knee.
The first part of the video presents testing of the medial collateral ligament (MCL) in the left unaffected knee. The metallic strip indicates the vertical line. It is obvious in the video that application of counter pressure above the lateral knee with right hand while the left hand presses above the medial ankle didn’t produce any deviation of the left leg from the vertical axis (metallic strip). This means that the medial collateral ligament of the left knee is sustainable.
The second part of the video presents the application of the same test on the right knee. As readers may see, similar application of the counter pressure between two hands now demonstrates the lateral deviation of the right leg. Readers can see that by comparing lateral movements of the leg from the vertical line (metal strip) on both sides.
If the ligament is strained or partially damaged the Periostal Trigger Point will form at its insertion and the therapist must examine the periosteum in the same way as we described above in the evaluation of Periostal Trigger Points.
We will publish Part IV of “Science of Palpation” article in the next issue of JMS. It will cover palpation of the soft tissues located in the deep layers. This publication will complete our series of articles on patient evaluation: “Science of Clinical Interview,” “Science of Visual Observation” and “Science of Palpation.”
REFERENCES
Al-Shengiti, A.M., Oldham J.A. Test-retest reliability of myofascial trigger point detection in patients with rotator cuff tendonitis. Clin Rehabil., 2005 Aug;19(5):482-7
Berner J, Zufferey P. Achilles tendinopathy. Rev Med Suisse. 2015 11(465):606-8, 610-1.
Dickle E., Schliack, H., Wolff, A. Bidegewebsmassage, Stuttgart, 1979
Ebner, M. Connective Tissue Manipulations. Krieger Publishing Company, Malabar, Florida, 1985.
Kibler M. Das Strorugsfeld bei Gelenkerkrankungen und inneren krankheiten. ‘Hippokrates’, Stuttgart, 1958
Kovanov V.V., Travin, A.A. Surgical Anatomy of Extremities. Moscow, “Medicina”, 1983
Vogler P., Krauss H. Periostbehandlung. Leipzig, 1953.
Windisch A, Reitinger A, Traxler H, Radner H, Neumayer C, Feigl W, Firbas W. Morphology and histochemistry of myogelosis. Clin Anat. 1999;12(4):266-71.
Category: Medical Massage
Tags: Issue #2 2016