
In previous issues of JMS, we discussed the pathophysiology of Chronic Headache (CH) and Migraine (MG) and clinical evaluation of patients with greater and minor occipital nerves entrapment in the posterior neck. We highly recommend new readers read Part I and Part II of this article published in issues#2 and #3, 2012 of JMS.
In this current issue, we continue the subject of clinical evaluation but we concentrate on the examination of the secondary symptoms in the scalp and around the eye associated with CH and MG. In the next issue of JMS, we will discuss the MEDICAL MASSAGE PROTOCOL for the management of CH and MG.
1. EVALUATION OF THE SCALP AND EPICRANIAL APONEUROSIS
If you have experienced a headache, even once, you know that this uncomfortable sensation consists of two major components: The pain itself and the feeling of the head being “squeezed.” Ironically, patients with CH and MG very quickly learn that the pain and “squeezing” sensations can be relieved in some degree by the additional compression of the head, which patients frequently performed on themselves.
The uncomfortable sensation of head-squeezing results from tension build-up in the scalp and especially in the epicranial aponeurosis. Mapping this tension before formulating and applying a MEDICAL MASSAGE PROTOCOL is an extremely important component in the successful treatment of patients with CH and MG.
In many cases, the application of a MEDICAL MASSAGE PROTOCOL effectively decompresses the occipital nerve(s), and results in headache relief. However, if the scalp and especially the epicranial aponeurosis were not addressed at all or were not addressed sufficiently, the “squeezing” sensation experienced by patients is replaced by a heaviness in the area of the head where the pain formerly manifested. In such cases, the practitioner may expect a very high probability that the headache will return very soon.
First, let’s look on the anatomy of the scalp which consists of five layers of the soft tissue (see Fig. 1). April (1990) proposed a very helpful mnemonic to memorize the scalp’s anatomical structure. Each layer of the scalp corresponds to the letter in the word SCALP.
S – skin
C – connective tissue
A – aponeurosis
L – loose connective tissue
P – periosteum of the cranial bones
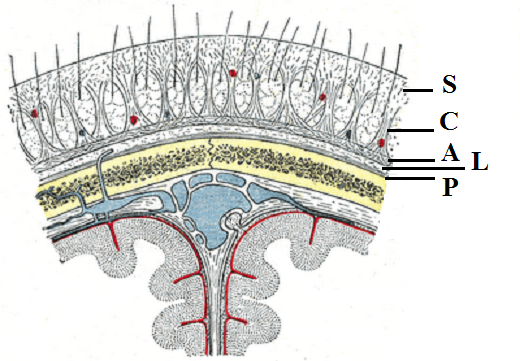
The skin on the head feels thicker because of hair, sebaceous glands and the underlying epicranial aponeurosis. The subcutaneous tissue mostly consists of dense connective tissue that firmly binds the skin to the underlying aponeurosis.
The epicranial aponeurosis is musculotendinous structure with a tendinous part that covers the skull like a parachute while several flat muscles (suboccipitalis, frontalis, occipitalis etc.) insert into the aponeurosis peripherally and maintain it under significant tension by stretching apeneuroisis down over the skull.
Loose connective tissue binds the epicranial aponeurosis to the periosteum of underlying cranial bones. This connection is loose and it permits considerable movement of the scalp over the skull. Grab your hair and pull it in the horizontal direction to examine elasticity of loose connective tissue. Thus, the loose connective tissue forms a complicated network of fibrotic strings, which link the scalp and cranial bones but allow the scalp’s mobility.
Another important issue worth mentioning is innervation of the bones that form the skull. As we know, each bone is covered by periosteum which is a 2-mm to 3-mm thick connective tissue membrane and contains all the sensory receptors responsible for maintenance of the normal bone function. The excruciating pain when one suffers from a fractured bone does not come from bone damage since the bone has no pain receptors. The pain is a result of tear of the periosteum where all pain receptors are located.
As we learn in Part I and II of this series of articles (see issue #2 and #3 of 2012), irritation or compression of the greater and/or minor occipital nerves is one of the leading causes of CH. If, for example, the greater occipital nerve, responsible for the innervation of the occipital and parietal scalp on the half of the head, is irritated then a CH will be triggered as a result of local vasoconstriction in the extracranial arteries that provide the blood supply to the scalp, epicranial aponeurosis, periosteum and cranial bones. The local vasoconstriction, especially when it is present for some period of time, is directly responsible for the increase of tension in epicranial aponeurosis and especially in shortening fibrotic strings, which hold the epicranial aponeurosis against the skull and anchors into the periosteum of cranial bones. These strings place unnecessary pressure on the periosteum, which is very richly innervated, and it activates the pain receptors which, in turn, contributes to the clinical picture of CH. Thus, tension in the epicranial aponeurosis in combination with shortening of fibrotic strings, which are attached to the periosteum of cranial bones, are two major reasons why patients with CH and MG have the sensation that their head is being “squeezed.”
The examination of the scalp starts during the clinical interview. The practitioner must ask if the patient has or has had “squeezing” sensations during the headache. He or she should require that the patient indicates the exact location of the headache to pay attention to these areas during the palpatory examination.
When examining the scalp, the practitioner should start above the occipital ridge and move up, applying moderate pressure on the scalp while asking the patient to report any painful spots. The therapist should mark these areas on the head diagram. Usually, the painful areas have a tendency to locate along the pathway of the irritated nerve: greater or/and minor occipital. The video below shows the examination of the scalp on the occipital part of the head.
First, apply mild pressure to the scalp to examine if there is water retention in the epicranial aponeurosis. Compare the sensations under your finger in the area where the patient is complaining about CH or MG to the unaffected areas. In the affected area, you will feel your fingers sink into the softer, thicker tissue while in the unaffected area the finger will almost immediately meet resistance from the cranial bones. In severe cases of CH and MG, even the first part of the palpatory examination of epicranial aponeurosis will trigger local or radiating pain.
Next, apply stronger pressure directed horizontally to shift scalp forward and estimate degree of tension build up in the fibrotic bridges which control degree of tightness developed in epicranial aponeurosis. The practitioner may feel these areas as restricted mobility of epicranial aponeurosis while scalp is pushed forward.
If the tension in the epicranial aponeurosis is detected the practitioner must include Scalpotherapy into the treatment protocol.
There are two areas on the top of the head that are important as a diagnostic criteria and as a treatment target. These two areas on each side of the head are called Grinstein’s Points (Lymansky et al., 1988). Let us use the example of the construction of a dome to illustrate Grinstein’s Points, their clinical value and the mechanism of their formation. Fig. 2 illustrates the process of building the dome. To replay the diagram please click at the beginning of the sliding bar (blue line) located just below the diagram.
The construction of the dome starts with building the platform (the thin black line in the video) on the top of drum that supports the dome from below. At the beginning, the dome’s walls are vertical but later during construction they need to curve inward to form the dome. For the walls (blue curving lines in the video) to curve in without collapsing, they need to be supported from below by a network of beams (thin black vertical lines in the video). As they curve in, the walls get closer and closer until only a small opening is left at the top of the dome. For the entire dome to be stable, the builders will place a special stone, called the key, in this opening. When the key (black octagon in the video) is inserted, it will prevent the walls from collapsing inward and, at this point, the support beams and platform can be safely removed and the dome is finished. Thus, the weight of the dome is supported by the key, and the drum that supports the dome from below (white arrows in the video).
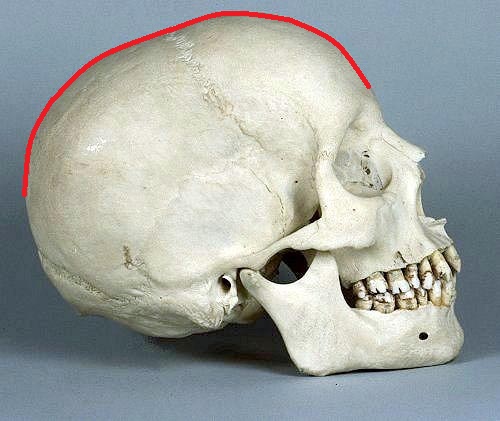
If the reader looks at Fig. 3 of the lateral view of the human skull, he or she will find that the upper part of skull has dome-like shape (red line). This structure is why the combined pressure of the force of gravity and the weight of the cranial bones will be greater at the very top of the skull, which we may consider a “key” and the base of the skull we may see as a “drum.”
An additional the factor contributing to excessive tension build-up on the top of the head is the presence of two cranial sutures that cross each other: The sagittal suture and the coronary suture (see Fig. 4)
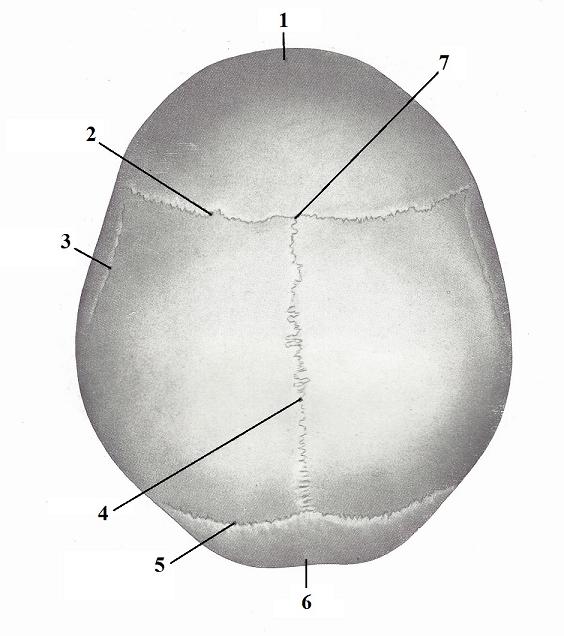
| 1 – frontal bone 2 – coronal suture 3 – temporal line 4 – sagittal suture |
5 – lambdoid suture 6 – occipital bone 7 – intersection of two sutures (area of lower Grinstein points) |
All cranial sutures are synarthroses, which permit micromovements between cranial bones, and are responsible, to some degree, for the elasticity of the skull. The combination of tension in the “key” part of epicranial aponeurosis and fact that two major cranial sutures cross each other is why the Gristein’s Points are areas of greatest tension that developed on the top of the head even in healthy people. For those who suffer from CH and MG, these areas are major contributors to the “squeezing” component of a headache and to the pain itself.
Grinstein’s Points provide significant diagnostic and clinical value since their presence indicates tension forces in the epicranial aponeurosis and presence of periostal trigger points. If Grinstein’s Points are active, Perisotal Massage must be included in the treatment session. There are two diagnostic criteria for the Grinstein’s Points: one is the clinical interview and the second is the palpatory examination.
The patient may mention the presence of pain at the top of the head. However, in many cases, the practitioner must ask if the patient has or had pain on the top of the head and if he or she has the squeezing component of CH or MG.
The practitioner uses the second diagnostic criteria during the patient’s palpatory examination. The Gristein’s Point must be examined using palpation and compression even if the patient did not complain about pain on the top of the head during the clinical interview.
The videos below illustrates the examination of Grinstein’s Points. It is more effective if the patient is positioned on his or her back. Look at the tip of patient’s nose, visually continue the line from this point to the middle line of the forehead and the parietal (top) part of the head. Upper Gristein’s Points are located on both sides of this middle line approximately 1 inch to 1.5 inches from the patient’s hairline. Apply compression against the cranial bones using both thumbs with equal pressure. The pressure must be moderate.
The test is considered positive if, during the application of direct moderate pressure against the cranial bone, the patient feels acute pain under one or both thumbs. In many instances our patients described this pain as if someone was “driving a nail into their head.” Considering that in many cases, patients with active Grinstein’s Points felt no pain in these areas before the test, they are shocked by the intensity of the pain and may think the therapist is using very strong pressure. Move the thumbs in the neighboring areas and apply a similar pressure to let the patient to feel difference.
The lower Grinstein’s Points are located on both sides of the middle line just above the hairline and usually are less painful. The second part of the video illustrates the palpatory examination of the lower Grinstein’s Points.
2. EXAMINATION OF TRIGEMIAL NERVE
As we discussed in Part I of this article (see Issue #2, 2012, JMS), the major cause of a Cluster Headache located around the eye is the presence of the trigeminocervical convergence (Piovesan et al, 2001; Busch et al., 2004; Bartsch, 2005) between the greater occipital nerve and the trigeminal nerve, especially its supraorbital division and, to a lesser degree, the maxillary division (see Fig. 5).
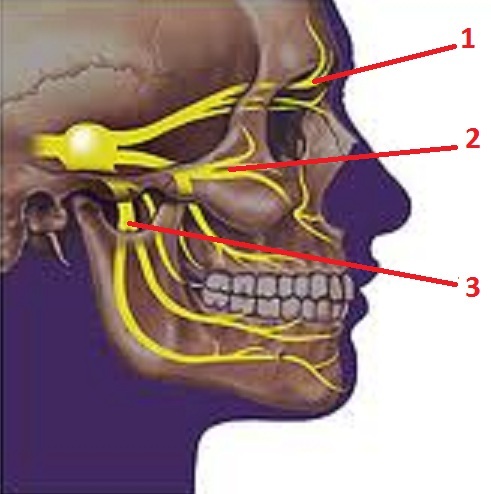
1 – ophthalmic division
2 – maxillary division
3 – mandibular division
During the clinical interview, the practitioner must clarify the issue of a Cluster Headache. Patients who suffer from it will mention the pain and tension around the eye even at the beginning of the interview. However, the practitioner must separately discuss this issue. First of all some, patients with CH experience a Cluster Headache only occasionally, and often blame the tension around the eye on allergies and Sinusitis. On a weekly basis, we see patients diagnosed with a Sinus Headache who in reality have a Cluster Headache as a result of trigeminocervical convergence between the greater occipital and trigeminal nerves.
Thus, the practitioner must determine if the patient has pain and tension around the eye while experiencing a headache or if the pain radiates into the area of orbit. Also, the practitioner must ask if the patient has or had sensations of tingling or numbness around the eye and/or on the forehead.
CT is the first part of palpatory evaluation of the trigeminal nerve involvement in the clinical picture of Cluster Headache. Please see Fig. 5 to better understand video below which illustrates the application of CT for each branch of trigeminal nerve. CT is easier to conduct with the patient positioned on the back.
First part of the video illustrates the application of CT on the ophthalmic division of the trigeminal nerve. The practitioner applies moderate pressure to the supraorbital notch where the supraorbital branch of the trigeminal nerve (ophthalmic division) is located under the skin and is directly accessible after its exit from the facial skeleton. Pay attention to the direction of applied pressure, which is indicated by the white arrow. Also ask the patient to close eyes, concentrate on the sensations and report even mild differences between affected and unaffected sides.
The second part of the video illustrates the application of CT on the maxillary division of the trigeminal nerve. The practitioner applies moderate pressure to the infraorbital foramen where the infraorbital branch of the trigeminal nerve (maxillary division) is located under the skin, and is directly accessible after its exit from the maxilla (i.e. upper jaw). Pay attention to the direction of applied pressure, which is indicated by the white arrow.
The third part of the video illustrates the application of CT on the mandibular division of the trigeminal nerve. The practitioner applies moderate pressure to the mental foramen where the mental nerve which is branch of mandibular division of the trigeminal nerve is located under the skin and is directly accessible after its exit from the mandible (i.e. lower jaw). Pay attention to the direction of applied pressure which is indicated by the white arrow.
CT is considered positive if moderate pressure applied in these areas triggers acute pain. For patients with occasional Cluster Headaches, usually only the ophthalmic division is involved. Patients with chronic Cluster Headache may have maxillary division affected and, in very rare and severe cases of long-lasting CH and MG. the mandibular division of the trigeminal nerve can be involved.
What is the clinical value of CT? If this test is positive in any of these points, the practitioner must incorporate local treatment there. This local treatment for each spot consists of circular friction, stretching and electric vibration. We will discuss this treatment in the final part of this article in the next issue of JMS.
The trigeminal nerve provides sensory innervation of the face, while the facial nerve is responsible for the motor innervation of the mimic musculature of the face. Pain signals and other sensory abnormalities (e.g., tingling, numbness) are conducted via the trigeminal nerve. This is why the practitioner should use the Sensory Test to evaluate the degree of involvement of the trigeminal nerve’s branches. The video below illustrates the application of the Sensory Test for the supraorbital, maxillary and mandibular divisions of the trigeminal nerve.
To examine the ophthalmic division of the trigeminal nerve, i.e., the supraorbital nerve, ask the patient to close his or her eyes and slowly strike the skin of the forehead with fingernails, asking the patient to report any differences in the sensations. The ST is considered positive if the patient reports a decrease of sensation on the affected side of the forehead, or if the superficial stimulation of the skin triggers an electric-shock type sensation.
The similar stimulation of the skin below the eyes laterally to the nose allows the practitioner to determine if the maxillary division of the trigeminal nerve is affected. The sensory stimulation along the mandible will reveal any sensory abnormalities in the mandibular division of the trigeminal nerve.
If the ST is positive in any of the areas discussed above, the practitioner must include intensive work in the form of superficial friction, electric vibration, and/or Connective Tissue Massage strokes on the face.
3. EXAMINATION OF THE EYE AND ORBIT
The eyeball, located in the orbit, has a very complicated support system that holds each eyeball in a suspended position while, at the same time, executes a very quick, complex and precise movements needed for constant repositioning of the eyeballs. Fig. 6 illustrates the anatomy of the extraocular musculature, which is directly responsible for the eyeball’s movements. The motor function of these muscles under the control of the oculomotor, trochlear and abducens cranial nerves and trigeminal nerve has nothing to do with the action of the extraocular muscles.
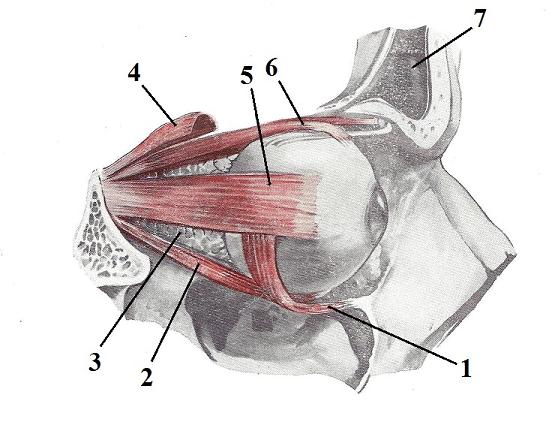
| 1 – inferior oblique m. 2 – inferior rectus m. 3 – infraorbital fat 4 – levator palpebrae superior m. |
5 – lateral rectus m. 6 – superior rectus m. 7 – frontal sinus |
However, as we discussed above, the trigeminal nerve is a sensory nerve and is solely responsible for the innervation of the soft tissues inside the orbit and especially its connective tissue structures, which play a critical role in the free suspension of the eyeball inside the orbit. This is a critical fact for any practitioner helping patients with CH. There are three key fascial components that control the positions of the eyeball: the Tenon capsule, check ligaments and connective tissue septae. Tension in these components is one of the direct, contributing factors to a CH. Let us quickly review the anatomy of the soft tissue in the orbit. Fig. 7 illustrates the inferior view of cross section anatomy of the orbit and the eye.
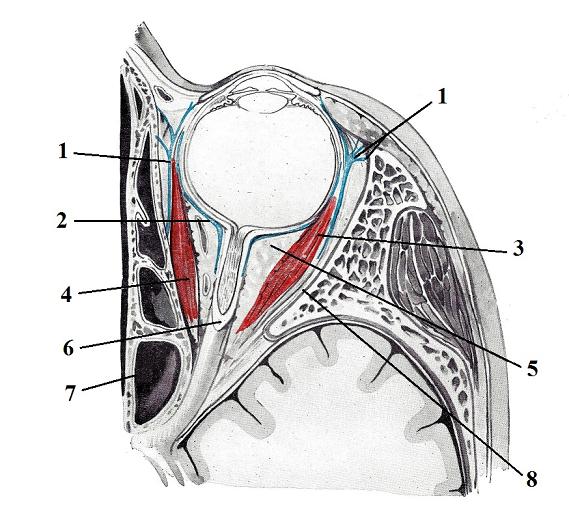
| 1 – check ligaments 2 – Tenon capsule 3 – lateral rectus m. 4 – medial rectus m. |
5 – infraorbital fat 6 – optic nerve 7 – ethmoidal sinus 8 – periorbiral tissue |
The Tenon capsule surrounds the posterior surface of the eyeball and separates it from fat tissue located behind the eye. Another important issue is that all extraocular muscles insert into Tenon capsule, which is used as stabilization point allowing movements of the eyeball.
On the lateral and medial sides of the orbit there are two so-called check ligaments. They are extensions of connective tissue sheath that cover the medial and lateral rectus muscles. The medial check ligament attaches to the medial orbital wall, while the lateral check ligament attaches to the lateral orbital wall. Both form a hammock below the eyeball that keeps it in suspended position. Thus, the check ligaments prevent the downward displacement of eyeball allowing the extraocular muscles to freely move it.
Another important stabilization force that helps keep eyeball in a suspended position is the multiple connective tissue septae, which originates from the entire surface of the eyeball, more precisely from Tenon capsule, and extends to the periorbital tissue like spokes on a wheel. Fig. 8 illustrates the connective tissue septa (Koornneef, 1982).
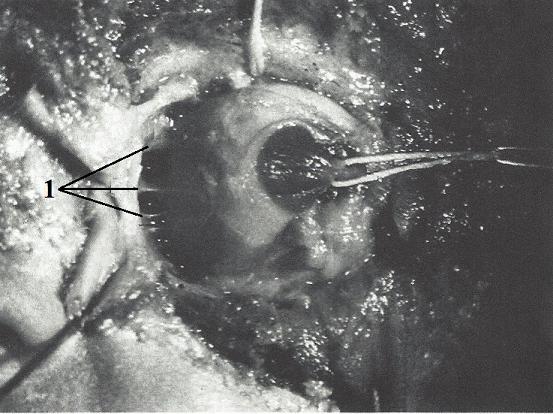
1 – connective tissue septae
Now, let us review why this information is so important for the practitioner who plans to treat the patient with a CH. If irritation or compression of the greater occipital nerve is responsible for the trigeminoccipital convergence, the ophthalmic division of trigeminal nerve suffers first with following changes in the function of soft tissue in the entire orbit. In such case, tension develops in the check ligaments and connective tissue septae. Shortening of check ligaments makes the hammock the eyeball is positioned on flatter and it pushes the eyeball slightly forward from the orbit on the affected side when compared to unaffected side. As we discussed in the Part I of this article, CHs are always a unilateral pathology.
Additionally, the shortening of the connective tissue septae restricts movements of the eyeball and elicits external pressure on Tenon capsule, which in turn compresses the eyeball. The goal of the eye examination is to discover if there tension has developed in the connective tissue structures inside the orbit
The final important piece of information the practitioner must obtain from the patient is the presence of visual changes, especially on the affected side. Ask the following questions:
* Did you have episodes of blurred vision while having CH?
* Has your vision changed since you started to have headaches (e.g., new glasses)?
* Do you feel that your eyes get “tired” quickly?
* Do you feel the need to frequently rub eyes or apply pressure on the eyeballs?
These questions allow the practitioner to estimate the degree of tension developed in the soft tissue in the orbit that supports the eyeball before the practitioner starts the palpatory examination.
Before application of EPT, the practitioner must explain the nature of the test and its goals to the patient and obtain his or her permission. During the application of the EPT, the patient must be positioned on the back with his or her eyes closed, and practitioner should sit behind the patient’s head. The patient must remove contact lenses before application of the test. The EPT consists from two parts and video below presents the application of the first part of EPT.
First, the practitioner should place both index fingers on the closed eyes. Each index finger is supposed to follow the contour of the eyeball precisely. To do that, spread your elbows, trying to keep the forearms horizontal on the level of the examined eyes. Apply very gentle pressure.
The EPT is considered positive if the practitioner feels on the affected side that the eyeball sticks out of the orbit slightly more compared to the unaffected side. Fig. 9 illustrates the position of both eyeballs in a normal side and in the case of a right side CH where the connective tissue structures surround the eye shorten and push the eyeball out of the orbit. In the video it can be seen as right index finger is slightly higher than left index.
.jpg)
For the second part of EPT (see video below), apply mild repetitive vertical compressions on both eyeballs with the index fingers to detect elasticity of the extraocular connective tissue structures in the orbit. On the normal side, the application of light repetitive compressions will push the eyeball up and down like a “fishing float.” On the affected side, the patient will report acute pain during application of repetitive compressions, and the eyeball shows much more resistance to applied vertical pressure. It does not easily go up and down like on the normal side.
If the palpatory examination of the orbit and the eye confirmed presence of the tension in the extraocular connective tissue structures, the practitioner must include Eye Treatment in the MEDICAL MASSAGE PROTOCOL. We will discuss this subject in the final part of this article in the next issue of JMS.
In this issue, we finish discussing the diagnostic evaluation of patients with CH and MG. Some readers may consider this is a great deal of information to remember and apply. We would like to emphasize that the successful management of CH and MG is a very complicated subject. Practitioners seeking to successfully treat people suffering from these debilitating pathologies can benefit from this information to increase their knowledge of their craft. A complete evaluation of the somatic component of CH and MG is the foundation for successful treatment.
Finally, we wrote such lengthy articles to present information for the readers in a thorough and complete way possible, and to not overlook or omit even the smallest details. If you master all the tests discussed in this and previous issues ofJMS, you will discover that the entire evaluation will take 30 minutes including the interview.
Bartsch T. “Migraine and the neck: new insights from basic data.” Current Pain Headache Report. 2005. Jun.; 9(3):191-6
Busch V, Frese A, Bartsch T. “The trigemino-cervical complex. Integration of peripheral and central pain mechanisms in primary headache syndromes.”Schmerz. 2004. Oct.18 (5):404-10
Kiss F., Szentogothai J. Atlas Anatomie Corporis Humani. ‘Medicina’ Budapest, 1960
Koornneef L. Orbital Connective Tissue. In: Biomedical Foundations of Ophthalmology. Vol. I., Edited by: W Duane, 1-32. Lippincott Williams & Wilkins, Philadelphia, 1982.
Lymansky Y.P., Macheret E.L., Vaschenko E.A. The Neurological Symptoms of Spondylosis. Zdorovie, Kiev, 1988
Piovesan E. J., Di Stani F., Kowacs P.A., Mulinari R.A., Radunz V.H.;Utiumi M., Muranka E.B., Giublin M.L., Werneck L.C. “Massaging over the greater occipital nerve reduces the intensity of migraine attacks: evidence for inhibitory trigemino-cervical convergence mechanisms.” Arq. Neuro-Psiquiatr. Vol.65 No. 3a: Sao Paulo. Sept. 2007
Category: Medical Massage
