
This is the fourth part of our article on the clinical management of Chronic Headache (CH) using medical massage therapy. Please be sure to review the first three parts of the article in Issue #2, #3 and #4 2012 of JMS. We will be discussing the step-by-step application of the main part of the MEDICAL MASSAGE PROTOCOL for CH which is triggered by the irritation of the greater and minor occipital nerves. In the final part of the article, which will be published in the next issue of JMS, we will discuss the treatment protocol of the secondary symptoms associated with CH using Scalpotherapy, Eye Treatment etc.
For this article we used and elaborated on the information taken from www.scienceofmassage.com’s Video Library. The protocol is presented as a sequence of steps with an approximate time duration and degree of applied pressure. The protocol presented below covers all the aspects of treatment while in a real life scenario, the actual treatment would be much shorter. If for example, the patient does not exhibit the signs of connective tissue zones on the posterior neck and upper shoulders or there are no symptoms of Cluster Headache, the practitioner must then exclude the steps for connective tissue massage or Eye Treatment from the protocol. Thus, the effectiveness of the treatment depends from the correct evaluation of the tissue before the actual treatment is started.
MEDICAL MASSAGE PROTOCOL
The main goal of the first four steps is to eliminate protective muscular tension (especially in the cervical paravertebral muscles) that has formed as a secondary reaction to the CH and remove any anxiety or fear of the unknown from the patient’s mind.
Step 1. Work on both sides of the neck and upper shoulders while the patient is positioned on their back
Duration: 1 min.
Pressure: Below the pain threshold.
Start with bi-manual effleurage strokes from the sternum along the anterior and posterior shoulders to the occipital ridge. Pay attention to the position of the elbows during the strokes. End each stroke with a short stretch of the neck. The white arrows indicate the direction of the passive stretch.
Next, apply ridged friction along the same area. While applying strokes, try to slightly flex and tighten your wrist joints while pressing your forearms against the table. This allows you to use your arms as leverage to slightly elevate the patient’s shoulders while applying the strokes. End this step with the repetition of the effleurage strokes.
Since the trapezius muscle is one of the main contributors to the irritation or compression of the greater occipital nerve, the practitioner must concentrate first on both trapezius muscles as it is shown in Step 2 and 3.
Step 2. Work on the unaffected side of the upper shoulder and upper back (the patient is on their stomach)
Duration: 1 min.
Pressure: Below the pain threshold.
Apply intense kneading of the upper shoulder muscles on the unaffected side. Later, work along the insertion of the trapezius muscle into the spine of the scapula, the medial edge of the scapula, and line of the spinous processes.
Step 3. Work on the affected side of the upper shoulder and upper back.
a. Kneading of the trapezius muscle in the inhibitory regime
Duration: 1 min.
Pressure: Below the pain threshold.
Begin on the distal part of the trapezius muscle employing kneading with a stretching component.
Move to the middle of the belly of the horizontal portion of the trapezius muscle and employ kneading with a lifting component.
Finally, apply kneading with a stretching component on the proximal part of the horizontal portion.
b. Relaxation of the cervical paravertebral muscles
Duration: 2 min.
Pressure: Below the pain threshold.
Apply the technique for relaxation of the cervical paravertebral muscles. The Relaxation of the Cervical Paravertebral Muscles is a technically complex technique and it targets the entire bulk of the paravertebral muscles. It is a very important component of the therapy because it is only one technique which allows to stretch the cervical paravertebral muscles in a horizontal direction (away from the vertebral column).
The patient should slightly flex the neck and place his or her head on the forehead in head cradle (as opposed to placing the face in the head cradle, as is normally the case). The resultant forward neck flexion will so to speak “open” the posterior neck.
At the beginning of the video the dots indicate the line of the spinous processes of the cervical vertebrae.
The practitioner should begin by creating a fold of skin. There are two steps to this part of the technique.
Step one: Place the 3rd and 4th fingers flat on the lateral neck and pull only the skin from the lateral neck upwards without fingers sliding along the skin. The applied pressure is directed vertically.
Step two: Use your thumbs to additionally push the skin on the posterior neck backwards (i.e. to the vertebral column) and to get both thumbs into the groove. Notice the position of the thumbs.
As soon as the thumbs are in the groove (i.e., between the spinous processes of the cervical vertebrae and the medial edge of the cervical paravertebral muscles), ease the pressure of the 3rd and 4th fingers without releasing them from the skin while simultaneously pushing the paravertebral muscles laterally away from the vertebral column. Both thumbs supposed to stay in the groove. The practitioner should fit 2 to 3 of such lateral pushes into each of the patient’s long exhalations. In the video, the application of the same technique is shown from the lateral view.
This video shows the body mechanics to be observed during the application of this technique. As you can see in the video, the practitioner uses his body weight as the driving force of the technique.
To form the fold of skin lean your body backwards, and to push the paravertebral muscles laterally lean forwards. Also, spread your elbows during the stretching of the paravertebral muscles. This helps keep the thumbs apart so as to maintain fluidity of the technique.
In the last part of this video, incorrect positioning of the hands and thumbs is shown. If the practitioner keeps the elbows extended, the thumbs get very close to each other and the rolling push of what otherwise would have been the correct application becomes instead a short jolt. This would make the application of this technique uncomfortable for the patient, especially if he or she is experiencing cervical pain.
The application of this technique also allows to prepare the patient’s neck for the next treatment: Friction on the lateral surfaces of the spinous processes of the cervical vertebrae. Relaxation of the paravertebral muscles widens the groove between the lateral surface of the spinous processes of the cervical vertebrae and the medial edge of the cervical paravertebral muscles. It allows the practitioner to place the thumb deeper into the groove.
c. Friction on the lateral surfaces of the spinous processes of the cervical vertebrae (Sherbak’s friction)
Duration: 1 min.
Pressure: Below the pain threshold.
Apply repetitive friction on the lateral surfaces of the cervical vertebrae which are painful during the application of direct pressure.
This technique targets the lateral surface(s) of the spinous process(es) of the vertebra(e) into which the fascia which covers the paravertebral muscles inserts. This technique was first proposed by Professor A. E. Sherbak, MD of Russia and thus carries his name.
This technique should be used only on those spinous processes which are painful in the instance of direct pressure applied in the medial direction. Pain in the periosteum on the lateral side surface of the affected spinous process must be eliminated because it is a silent contributor to the tension in the paravertebral muscles, and Sherbak’s friction is the only technique which is specifically designed to do so. There are two variants of this technique: A one-handed and a two-handed variant. On the neck, the one-handed variant is used. Considering that it is difficult to see the application of the technique on the neck we will demonstrate its application on the example of the thoracic vertebrae first. The black dots at the beginning of the video indicate the spinous processes of the T7, T8 and T9 vertebrae.
The first step in the application of this technique is the correct placement of the thumb. Find the tip of the affected spinous process (T8 in the video), slide the thumb into the groove between the lateral surface of the spinous process and the medial edge of the cervical paravertebral muscles and apply pressure in the medial direction.
Pay attention to the position of the thumb. It should be strictly on its side in such a way that the soft pad of the thumb applies friction to the lateral surface of the spinous process. The only soft tissue between the practitioner’s thumb and the bone is the skin.
Friction is applied back and forth with a very small amplitude so that the thumb stays strictly on the spinous process. The video below illustrates the application of Sherbak’s friction on the neck.
At the end of Step 3, add the treatment of the cutaneous and connective tissue reflex zones , but only if they are present:
CUTANEOUS REFLEX ZONES
Duration: 3 min.
Pressure: Below the pain threshold.
This treatment is used only if the patient with CH has cutaneous reflex zones. Signs of cutaneous reflex zones are: local tingling, numbness, burning pain, and visual changes of the skin. Usually cutaneous reflex zones are located in the paravertebral area on the upper middle back and posterior neck. If the cutaneous reflex zones are present start the treatment with skin kneading and later add skin rolling. End the treatment with the application of superficial friction. The white arrow in the video indicates the direction of skin tightening during the application of superficial friction.
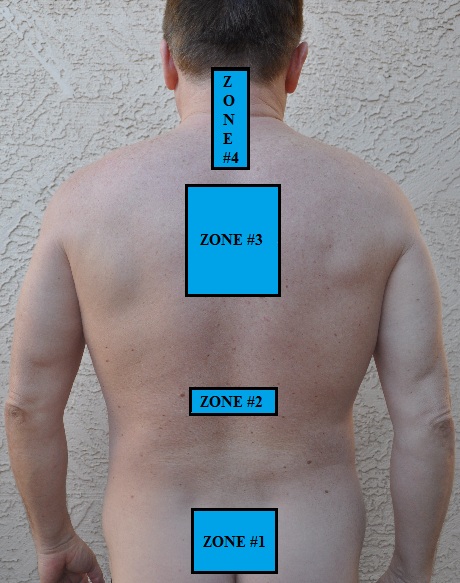
CONNECTIVE TISSUE ZONES (CTZs)
There are four connective tissue zones associated with non-migraine types of headache. Each of these areas should be examined and if CTZs are detected the practitioner should use Connective Tissue Massage to eliminate them.
The clinical symptoms of CTZs in the superficial fascia are: the thickening of the skin, the restriction of mobility of the skin in regard to the superficial skeletal muscles. In other words the skin becomes “glued” to the superficial fascia and the practitioner feels the restricted skin mobility in regard of fascia.
The clinical symptom of CTZs in the deep fascia is: significant tension in the trapezius muscle which the practitioner feels as a restricted mobility of the trapezius muscle. In such case the tension in the deep fascia ‘glues’ the trapezius muscle to the middle muscle layer (rhomboids. levator scapulae, etc.).
In the middle back the free edge of the trapezius muscle becomes immobile and very painful if the practitioner tries to push it medially (i.e. in the direction towards the vertebral column). On the posterior neck the practitioner may feel some restriction of mobility if he or she tries to push the free edge of horizontal (pressure applied in the direction of lower back) or vertical (pressure is applied laterally, away from the vertebral column) portion of the trapezius muscle.
Duration: The duration of CTM will depend upon how many zones need to be treated. On average, it should take 2 to 3 minutes to complete CTM strokes in each area. Use CTM only if the connective tissue zones are present.
Pressure: Below the pain threshold.
a. CTM strokes for Zone #3 and Zone #4
CTM strokes on the upper back and posterior neck. This is the most common location of connective tissue zones associated with chronic headache.
b. CTM strokes for Zone #2
Video shows CTM strokes on the middle back.
c. CTM strokes for Zone #1
Video shows CTM strokes in the lumbo-sacral area. Two solid lines indicate both iliac crests.
Step 4. Work on the trapezius muscle
Duration: 2 min.
Pressure: At the level of the pain threshold (first sensation of discomfort).
Begin with friction strokes along the fibers of the trapezius muscle just along their insertion into the spine of the scapula. Later switch to cross-fiber friction.
Step 5. Work along the occipital ridge where the cervical muscles insert into the skull
a. Bi-manual friction BELOW the occipital ridge
Duration: 3 min.
Pressure: Below the pain threshold.
Place the fingertips (brought together) of both hands below the occipital ridge on both sides, and apply circular and cross-fiber friction. Please notice in the video that the practitioner should bend his or her fingers such that the fingertips are positioned under the occipital ridge.
This treatment targets the tendinous parts of the posterior cervical muscles at their insertion at the occipital ridge. Besides reducing the tension in the tendinous part, this treatment prepares the tissue for the next treatment (see below) which addresses the origin of cranial aponeurosis.
b. Intense friction and compression ON the occipital ridge
Duration: 4 min.
Pressure: At the level of the pain threshold (first sensation of discomfort).
The fibers of the tendinous part of the posterior cervical muscles insert partly into the periosteum which covers the occipital ridge and partly into the cranial aponeurosis which starts from the ridge. As we discussed in the previous part of this article, the cranial aponeuorosis covers the head like a helmet and its tension is one of the main contributing factors to CH especially to its ‘squeezing’ sensations. Finally, the area where the greater occipital nerve emerges from the tendinous part of the trapezius and is now located under the skin; is directly accessible.
First, the practitioner should determine the area to be treated. At the beginning of the video, the line of the spinous processes of the cervical vertebrae is shown. The practitioner should apply treatment at the insertion of the trapezius muscle into the occipital ridge. This area is located where the paravertebral line meets the occipital ridge. This line is easier to find if the practitioner asks the patient to extend the head backwards against the practitioner’s resistance, rendering the insertions of the posterior cervical muscles into the occipital ridge visible and palpable. The tension in this area may irritate or compress the greater occipital nerve with the following development of the Greater Occipital Nerve Neuralgia (GONN).
Begin with cross-fiber friction employing pressure that is slightly above the pain threshold. Try to remain at the same spot while conducting the treatment.
The next step is the application of ischemic compression in the same area. Try to remain on the tendinous part of the posterior cervical muscles. Carefully control the position of the finger and do not slide it to either side of the tendon.
The pressure applied in this instance should in fact exceed the pain threshold. However, apply the pressure in stages using the “stop and go” technique (to review this technique, please read Part III of the article “Science Of Trigger Point Therapy” in July-August 2009, JMS). Also, notice that the pressure is applied at a 40- to 45-degree angle. Do not employ vertical compression because it is less effective. After releasing the pressure, apply several repetitive compressions during the patient’s prolonged exhalation. Repeat this sequence 2 to 3 times.
At the end of Step 5 the practitioner must work on the local hypertonic abnormalities detected in the posterior cervical muscles during the diagnostic assessment (see Issue #3, JMS, 2012).
REFLEX ZONES IN THE SKELETAL MUSCLES
To learn how to conduct trigger point therapy based on science please go to March/April, May/June, July/August, September/October issues of JMS, 2009. This is a very important subject since the practitioner who uses trigger point treatment incorrectly is responsible for the formation of myogelosises in the muscle tissue which triggers a vicious cycle of chronic tension built up in the skeletal muscles.
a. Trigger Point Therapy on the posterior cervical muscles
Duration: Approximately 2 minutes for trigger point therapy on each point.
Pressure: At the level of the pain threshold (first sensation of discomfort).
The video shows only the location of the most common trigger points in the upper portion of the trapezius, in the lower portion of the trapezius, in the levator scapulae, and in the semispinalis capitis muscles.
Give special attention to the trapezius muscle because tension there is the most common cause for the irritation of the greater occipital nerve and the subsequent development of CH. The white arrows indicate the upper-medial angle of the scapula. Pay attention to the position of the thumb and the direction of the applied pressure. The practitioner should apply trigger point therapy only if trigger points are present.
b. Trigger Point Therapy on the obliquus capitis inferior muscle
The practitioner who works on a patient with GONN should always examine the obliquus capitis inferior muscle and if the tension is detected, use Trigger Point Therapy there. Tension in the obliquus capitis inferior muscle is the major undetected cause for the greater Occipital Nerve Neuralgia (GONN). Because of the deep anatomical location of the obliquus capitis inferior muscle the practitioner should use a special approach to this muscle.
Place the thumb under the transverse process of the first cervical vertebra (the black dot drawn on the skin in the video). Another landmark for the correct position of the thumb is the tendinous part of the trapezius muscle. In the video, this part of the trapezius muscle is directly above the thumb. Thus, the practitioner should place the thumb just below it. Please notice the angle of the application of pressure.
c. Postisometric Muscular Relaxation (PIR).
The posterior cervical muscle provides complex biomechanical support to the head. Since the posterior part of the head is heavier, the force of gravity pulls the head forward and the posterior cervical muscles work in a very unfavorable regime: they must constantly fight with gravity to pull the head backward while executing fast and precise movements to control the head’s position. Thus to release residual tension in the posterior cervical muscles the practitioner must use PIR for each neck movement separately. In the neck the practitioner must use 2 levels of PIR for each targeted neck movement.
Head Rotation
Duration: 3 min (apply head rotation to both sides).
Pressure: Below the pain threshold
On the first level of PIR, place your posterior arm (not the elbow!) on the anterior shoulder and the palm on the patient’s temple. Ask the patient to rotate his or her head while you resist this movement. The white arrows in the video indicate the direction of the contraction.
Apply three passive stretches by passively rotating the patient’s head to the unaffected side during his or her prolonged exhalation. While rotating the head, be sure to keep the patient’s chin above his or her shoulder. While rotating the head during the stretching part place rotating arm on the patient’s forehead to avoid getting into the eyes. The rotation should be conducted within the patient’s limits of comfort and during long exhalations.
At the end of the third stretch, remain in this position and ask the patient to repeat the head rotation against your resistance. This is the PIR on the second level. Apply three passive stretches during the patient’s prolonged exhalation after the application of PIR on the second level.
Lateral flexion and shoulder elevation
Duration: 3 min.
Pressure: Below the pain threshold.
For the first level of PIR, place your posterior arm (not your elbow!) on top of the patient’s shoulder and the palm on the patient’s temple. Ask the patient to bend his or her head laterally, and simultaneously elevate the shoulder. Resist both movements. The white arrows in the video indicate the direction of the contraction. Passively stretch the cervical muscles during the patient’s prolonged exhalation as shown in the video.
At the end of the third stretch, remain in this position and ask the patient to repeat the head bending and shoulder elevation. This is PIR on the second level. Apply three passive stretches during the patient’s prolonged exhalation after the application of PIR on the second level.
Head extension
Duration: 3 min.
Pressure: Below the pain threshold.
On the first level of PIR, place both your elbows (medial surface) on the patient’s lateral shoulders and both your hands on the posterior head. Interlock the fingers of your hands. Now, ask the patient to extend the head backward while you resist this movement. Use the patient’s shoulders as stabilization points for your resistance. The white arrows in the video indicate the direction of the contraction. To minimize body-to-body contact, place a soft pillow between the patient’s back and your chest. Passively stretch the posterior neck muscles during the patient’s prolonged exhalation as shown in video.
At the end of the third stretch, remain in this position and ask the patient to repeat the head extension. This is the second level of PIR. Apply three passive stretches during the patient’s prolonged exhalation after the application of PIR on the second level.
Head and upper body extension
Duration: 3 min.
Pressure: Below the pain threshold.
On the first level of PIR, ask the patient to place his or her hands behind the head and resist the patient’s head and upper back extension as shown in the video. The practitioner should resist the movement by holding the patient’s forearms just above the wrist joints. The white arrows in the video indicate the direction of the contraction.
To minimize body-to-body contact, place a soft pillow between the patient’s back and your chest. Passively stretch the lower portion of the trapezius muscle by flexing the patient’s head and upper back forward during a prolonged exhalation.
At the end of the third stretch, remain in this position and now ask the patient to repeat the former head extension against your resistance. This is the PIR on the second level. Apply three passive stretches during the patient’s prolonged exhalation after the application of PIR on the second level.
Step 6. We will discuss Scalpotherapy in the next issue of JMS.
Step 7. Passive stretching of the neck.
This is the final part of the main protocol and it is designed to activate the Golgi tendon organ receptors in the cervical muscles to enhance the conducted therapy.
a. Passive stretching of the neck along its axis
Duration: 3 to 5 repetitions (half a minute).
Pressure: Below the pain threshold.
Repeat passive stretching of the neck along the axis of the neck.
b. Passive stretching incorporating rotation to the opposite side
Duration: 3 to 5 repetitions (half a minute).
Repeat passive stretching of the neck using the rotation to the opposite side.
In the final part of our article we will discuss supportive treatment for CH: Scalpotherapy, local treatment for Trigeminal Nerve Neuralgia and Eye Treatment.
Category: Medical Massage